Friday, February 22, 2013

Free St. Patrick's Day Banner

I was looking for something to hand on my fireplace for spring, and I came across this free printable for St. Patrick's Day.  This is simple to make.  All you need to do is print, cut, and hang.


Lucky for me, when I went to print this banner I discovered I was all out of card-stock (someone was using it to make paper airplanes).  So off I went to the store to buy some more.  When I tried printing the second time, I noticed my printer was running out of ink, ugh.  I should have bought some while I was out, but I like how the banner pieces were not mono-toned but a mix of different hues of green and yellow.  Its a happy mistake and they came out pretty cool! 

I cut them with scalloped edged scissors and gave a darker brushed border on the edges.  I used a light colored jute twine to hang.


Thanks to Sugar Tot Designs for this free printable!

Monday, February 18, 2013

Homemade Marshmallow Fluff

YUM...Fluff!  Who doesn't love fluff?  It's great for many things including on peanut butter sandwiches (fluffernutters), on desserts, and with hot chocolate, just to name a few.  And it's really easy to make yourself.  Here's how

Ingredients:

3 large egg whites
2/3 cup plus 2 tablespoons of sugar
1/3 cup water
3/4 cup corn syrup (not the high fructose kind)
1 teaspoon vanilla extract


Instructions:

1. Beat egg whites together until frothy.  Add 2 tablespoons of sugar and continue beating until soft peaks form.


2. Meanwhile, combine water, corn syrup, and 2/3 cup of sugar.  Cook over medium heat until soft-ball stage, or 240 degrees using a candy thermometer.


If you don't have a candy thermometer, like me, fill a small cup with water and a few cubes of ice.  You need really cold water to test.  Drop a few drops of the hot syrup into the water and then pick up with your fingers.  If you can roll it into a soft ball it is finished.  In the picture below, the syrup did not quite roll into a ball but is almost there.


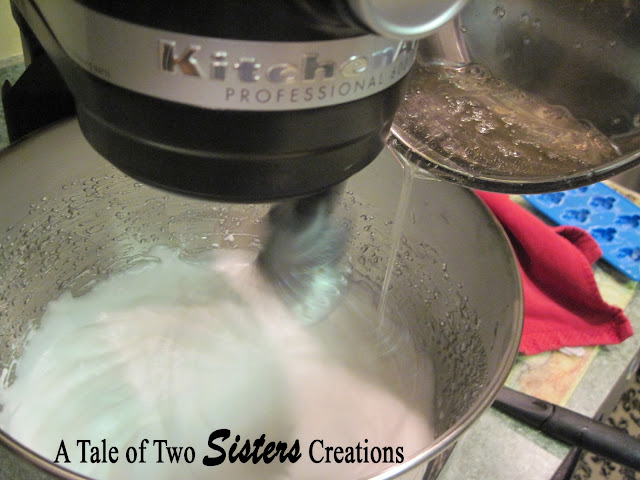
3.  When syrup is at the soft ball stage, pour into egg mixture.  Be careful, the syrup is quite hot!  Mix on high and add vanilla. 


 Continue mixing for about 5 minutes until it looks like marshmallow fluff.


4.  Store in the refrigerator for up to a month.


Chocolate fluff recipe coming coon!

Monday, February 11, 2013

Sherwin Williams 25% Off Coupon

Sherwin Williams is again offering 25% off all paints and stains, and 15% off painting supplies.  They have the BEST quality paints and stains.  This coupon is valid February 7-25.  To print the coupon visit their website.


Sunday, February 10, 2013

How to Clean Toaster Oven and Remove Melted Plastic

I have left a bag of bread near the hot toaster many times, and have had that bag melt onto the glass of the toaster.  I have tried scrubbing the melted plastic off, only to find that this does not make it come off.  By complete accident today, I have finally found a way to remove melted plastic on the toaster.  Sorry, no before pictures since this was an unexpected event.

I had my toaster oven on high, 450 degrees, for about 15 minutes and discovered the melted plastic was very soft and liquid like.  So, I took a paper towel and simply wiped it away.  Yes, all I did was turn the toaster oven on high, let it warm up for a bit, and then simply wiped the melted plastic off.  It is completely gone!  YES!  No more plastic.  It made me want to clean my toaster oven.  So here goes...

Here are the racks from my toaster oven.  They were full of burnt on stuff.  I put them in a plastic bag and poured some ammonia in it, about a 1/4 of a cup.  I then left them to sit in the bag for a good 6 hours.


When my racks came out they still had black stuff on them, but it easily wiped away using some brillo.  The ammonia loosened up all of that burnt on stuff and this is what I got.  I was surprised at how easy they were to clean, after soaking them in a little bit of ammonia.


While my racks were soaking, I cleaned the outside (and wiped the inside).  I only used brillo and some hot soapy water.  And did you notice that there is no melted plastic bag stuck on the glass door?


And yes my toaster oven is extra big.  That is because it is also a rotisserie.  I love this toaster oven and now it looks even better clean!

Saturday, February 9, 2013

How To Clean a Stainless Sink and Get Rid of Drain Odors

Time:  10-15 minutes


My kitchen sink was in need of a good cleaning!  It was looking pretty disgusting and the drain had an odor coming from it.  See the picture below, pretty bad right?  Well this tutorial will show how I got my sink to look shiny and great using baking soda, vinegar, boiling water, and Bar Keepers Friend.  I love Bar Keepers Friend because it removes rust stains without chemical odors.


1.  Sprinkle baking soda all over and around the sink area.


2.  Spray the baking soda with vinegar.  I keep a small spray bottle full of vinegar for cleaning.  Vinegar works great as a disinfectant  glass cleaner, and an air freshener   I suggest getting a spray bottle for yourself. I got mine at The Dollar Store.


3.  Let the baking soda and vinegar sit for about 10 minutes.  Put on a pot of water to boil.  After 10 minutes, pour the boiling all over the sink.  This helps to loosen the dirt and grime.


4.   Shake Bar Keepers Friend in the sink and take a scouring pad/cloth and clean all around and in the sink.   Rinse clean.

5.  To get rid of the drain odor ( I do not have a garbage disposal and we have a septic tank), pour baking soda down the drain followed by a 1/2 cup of vinegar.  Let sit for about 10 minutes and then pour boiling water down the drain.  This loosens and gets rid of odors, sanitizes  and removes grease from your sink drains.  Repeat once a month to keep drains free of blockages without using harsh chemicals.


Thursday, February 7, 2013

Home Decorators Pinterest Contest

One of my very favorite places to buy decor for the home is at Home Decorators.  They have created a Pinterest Contest going on now through February 17th.  Just follow directions below and Pin items for your dream bedroom or bathroom.

If you would like an example, I made my own board for my very small 1/2 bath on the 1st floor of my home.


Sunday, February 3, 2013

How to Clean a Gas Stove Top

Time:  Soak overnight, and as much time needed to scrub it clean (it took me an hour)

I have FINALLY found a way to clean my stove top that works.  For the past 4 years that we have had this gas stove/oven we have been scrubbing and scrubbing the top and we could never scrub all the baked/burnt stuff off, until now!


Here is how I did it:

1.  Wipe stove top clean
2.  Sprinkle baking soda all over


3.  Place a warm wet soapy towel over top and let it soak over night.  This helps loosen all that grime on the stove top.


4.  After soaking start scrubbing it clean.  I used steel wool/Brillo and, yes, a butter knife.  I used the knife to gently scrape and pry up all that burnt on grime.  Then I went over it with the steel wool to get any small particles left after scrapping.  Wipe clean and repeat as needed.  The butter knife worked really great for going around the burners and all the crevices   If I had just used the steel wool and not the butter knife, I would still be there trying to scrub away all that burnt on grime.  The butter knife will really help you, just remember to be gentle.


 My stove top looks so much better, doesn't it?  Almost new again!  Now I just have to find a way to clean the stove grates/burners.

Saturday, February 2, 2013

How to Paint Furniture

Cost:  $75-$100
Time:  6 full days of painting and dry time


Well I finally decided to start painting my dining room furniture that is over 30 years old.  If you missed it, here are my inspiration pictures.  

I spent about $75 on oil based primer, 1 quart of Sherwin Williams Oil Based Satin Enamel in black, a can of Flood Penetrol, a clear satin finish polyurethane, and on a few paint brushes and rollers. I used a 25% off Sherwin Williams coupon on the paint, saving about $25.  (You can find these coupons in the Sunday paper or set up an account at your local Sherwin Williams store and just ask for it!)


PRO-PAINTING TIPS

If you are going to paint furniture I highly recommend using a primer, to help the paint stick without chipping later on, and penetrol for oil based paints.  Penetrol eliminates brush or roller marks on your furniture.  These products really give a professional finish to your furniture. Sherwin William paints are great!  They are long lasting, durable, and have a beautiful finish.  If using oil based paint, make sure you are using the correct brushes, it really makes a difference.   See my earlier post on oil based painting tricks.


HOW TO PAINT FURNITURE

1.  Remove chair cushions and any hardware attached to the furniture.


2.  Use a primer and mix it with the penetrol (follow the directions for mixing).  Make sure you are working in a well ventilated area.  I painted in my garage with the doors open or cracked open.  You may want to sand your furniture, but this is not necessary if using primer made by Zinsser.  It can go directly onto glossy surfaces to make your furniture ready for painting.  Using a primer helps cover stains and helps adhere paint to your furniture to stop chipping and flaking.  Put on 1 good coat of primer and 2 coats on the table top that will get the most use.


The backs of my chairs are wicker and yes I painted them with a brush.  This helped get into all the crevices.  I used a brush especially made for oil based paints on the chairs and legs of the tables.  I used a roller on all other surfaces.  Using a roller on the tabletop and smooth surfaces is a must.
Let primer thoroughly dry before applying paint.


3.  Mix paint with penetrol. Apply your 1st coat of paint on your furniture.  Take your time and do not apply to heavily to avoid dripping.  Wait until paint is completely dry, about 6 to 8 hours, before applying a 2nd coat of paint.  This is very important because if the paint is not dry it will clump and streak.

Again, I used a brush on the chairs and legs of table and a roller on all the other surfaces.


 4.  Apply a coat of polyurethane on the table top or any other area to help protect your furniture from spills. I applied polyurethane to my table top and buffet.  The polyurethane I used has a clear satin finish.


5.  If using the same hardware, spray paint it the color you want or clean it well.  I chose to spray paint mine in in black with a gloss sheen.  Since the look of the hardware it a little outdated, I did not want to spray them in silver and have them stand out on the furniture.  Painting them black will help them to blend in to the black furniture.  When using spray paint, I recommend Rustoleum brand.  I have used this product in the past and it has never failed me.  Rustoleum spray paints are very tough and durable.


6.  Attach hardware and seats to furniture


7.  Stand back and admire your hard work!

Notice the black hardware?  It looks good!  Now I want to build a frame around the mirror on the buffet.  I am also thinking of maybe taking the wallpaper down or painting the white walls on the bottom another color.  What do you think?


 Tips:

If using oil based paints beware that your brushes and rollers will not come clean under running water much-like latex based paints.  You need to purchase mineral spirits to properly clean them.  I did not do this.  I saved money by buying only 2 brushes for oil based paint and 3 small rollers for cabinets and I "preserved" them between uses.  This is my tutorial on how I did this.


Lego Crayons

Cost: FREE plus the cost of the mold and crayons if you don't have them
Time: about 10 minutes for each mold


For Valentine's Day this year I have been trying to come up with a way to make non-candy treats for the kids at school, while spending next to nothing.  We came up with the idea of lego crayons using the lego mold and some old crayons that we have duplicates of or are broken.

This is also a great idea for party favors or candy making!  After cleaning my molds I might use them to make chocolate lego people for cake/cupcake toppers.

Here's how we did it:

1.  Collect the crayons you want to use
2.  Peel paper and chop into pieces
3.  Put crayon pieces into mold making sure to overfill each figure with crayon pieces.  Microwave for about 6-8 minutes (until pieces are melted)
4.  Cool in freezer or refrigerator

TIP:  Do not worry if you break a piece while taking it out of the mold.  Just put it back into the mold and remelt.  Good as new!


Pin It button on image hover