Pages

Thursday, January 31, 2013

Cleaning the Tops of Cabinets

Cost:  FREE
Time: 2+ hours


I have been looking on Pinterest for some inspiration for decorating the tops of my kitchen cabinets.  Since I have moved in my house, almost 5 years ago, I have done nothing to this area except throw random unused kitchen pieces up there.  To me this space in my house looks unorganized and junky, so its time for a change. But first being the neat and cleanly OCD person that I am, the tops of the cabinets must get a through cleaning 

Here's how I did it:

1.  Take everything down from the tops of your cabinets.  I will warn you now, if you have never cleaned this area it will be disgustingly dusty and the parts over my stove were sticky.


See I tried to warn you.  This cookie jar has a thick layer of dust, grease, and dead bugs.

2. Vacuum dust off cabinet tops.


3.  Wipe any sticky areas with warm soapy water and change water as needed.  Just look at how dirty the water got!


4.  Layer newspaper across the top of your cabinets.  This allows for easy clean-up the next time you decide to clean the tops of your cabinets.


5.  Place items of choice on top of kitchen cabinets.  This may take awhile as you arrange things into groupings.  I start with grouping of 3 objects in the corners and worked my way around the room until I was happy with the results.  I ended up using red and white items which match the decor around the house.


Much better!

P.S.-I hate my cabinets, or I should say I hate the color of my cabinets.  I don't want to paint them, buy hardware for them, or paint the counters because they will be replaced.  I do not want to spend the money on these things when I am saving to have them replaced.  So until that time I am just going to keep saving and make the best with what I have.


Monday, January 28, 2013

How to Clean a Routed Kitchen Table Edge

Cost:  FREE
Time:  5-10 Minutes


Do you have a kitchen table with a routed edge?  I do, and let me tell you it can get pretty gross with all kinds of food stuck in those corners from rolling out dough, making cookies, or from grubby little hands.  When I can start to see gunk building up, I know its time to give my kitchen table edge a good cleaning.  Cleaning the routed edge really brings life back to the table.  

You will need:

toothpicks 3-10 (depending on amount of gunk, and they do break when scrapping)
a warm soapy rag


See the white lines in the tables edge, that's the gunk!


First, I wipe down the edge with warm soapy water to help loosen the gunk. Then take your toothpicks and just start scrapping it away.  Did I tell you this is a great task for little hands?  Well it is!


Goss!  Just look at all that gunk (and germs and bacteria).  

When finished scrapping with your toothpick, just wipe clean.  Repeat scrapping if needed.

See it looks so much better doesn't it!  Now I bet you want to get rid of all your gunk too.  Go ahead, it only takes a few minutes.


Sunday, January 27, 2013

A Whovian Themed Dinner Party

If you have seen my previous post, you know I threw a super geeky Doctor Who themed party for my 1st "Whoniversary" in honor of me being a Whovian for a year! Here's how I threw a super cool themed party:

Planning. PLANNING. Did I mention planning? I scoured Pinterest for ideas for months (My Who-niversary board). I planned a menu and activities. I wrote it down, changed things around, thought about expenses, thought about reality.
I decided to have have 3 courses but serve buffet style (fancy but not snooty). I pre-made a table covering for each course. The reveal of each layer became the highlight of the party! See the tablescapes below!

Pin the Tentacle on the Ood: (one of my more brilliant ideas)

I made this Tardis blue bow for my front door. Super cheap, all of my ribbons were bought after Christmas for 75% off. So this cost about $1.50


Appetizer Course: Fish Fingers and Custard (Episode 5.1 The Eleventh Hour) I made actual custard AND tartar sauce (and called it custard) in case my guests were not so keen on being true to the story. To my surprise, the real custard was more popular than the tartar sauce. There is also cocktail sauce for that random guy who likes cocktail. It's labeled "blood control? blood control!" get it? (Episode 2.0 The Christmas Invasion)


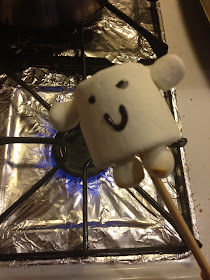
Adipose babies made by using a powered sugar/water glue to adhere big and little marshmallow together. Smiles are made with store bought black gel icing. (Episode 4.1 Partners in Crime)


 Note to self: Adipose can be toasted. YUM YUM

Main Course: "Pizza, Booze, Tele" (Episode 5.11 The Lodger). It's simple, frozen pizza and salad!


I "Doctored" my dressings a little to make them more timey-wimey. I simply replaced the labels on ranch and italian dressing bottles. "Anti Slitheen Solution" (Episode 1.5 World War Three) and "Adipose Juice" (Episode 4.1 Partners in Crime).
These are non-time consuming printouts that I made in MS Paint. Easy Peasy.


Dessert Course: My piece-de-resistance. Dalek cupcakes. A dessert food filled with evil, hatred, and dark chocolate. 


Exterminate! EXTERMINATE! EXTERMINATEEEEE!


Even a nerd girl can be a fashionista! Now, ALLONS-Y ALONSO!


Saturday, January 26, 2013

Tricks for Painting with Oil Based Paint

I recently painted my dining room furniture with oil based paint. Since I was using oil based paint, I did not want to deal with the messy clean up of brushes and rollers with mineral spirits or the extra expense of purchasing numerous painting tools.  My painting project took 4 days over 2 weekends.  This is how I "preserved" my brushes, rollers and paint trays between each coat of paint and each day of use. 
These tricks may also be used with latex paints.

PAINT TRAYS
I covered my paint tray with aluminum foil making sure to push the foil down into the tray.  I used 2 layers of foil over the tray just in case of a tear in the top layer of foil (which did happen with heavy use).  This made clean up very easy.  When finished, just take off foil and throw away.


BRUSHES
I bought brushes especially for oil based paints, which cost about $7 a piece, but I got lucky and found one marked on clearance to $3.  So I  bought 2 brushes for $10, one for the primer and one for my paint.  Then I used a few old brushes I had from painting with latex paint to get into small crevices.  Since I didn't want to spend any more on brushes and I knew my furniture painting project would take days (2 full weekends) to complete, I decided to preserve my brushes between each coat of paint and each weekend.  This method worked great for me.  My brushes never got dried out.

My long handled brush was folded 3-4 times into my plastic drop cloth.  This keeps the air away from the bristles and keeps the brush from drying out. 

This is a picture of the brush upon unwrapping.  The paint is still wet after 2 days!


Here is a picture of my brush wrapped up in the drop cloth.  Notice how the plastic is twisted around the brush to keep the air out.


My shorter brush was shut in a quart paint can.  Keep about an inch of paint in the can to keep the brush from drying out.  This can also be done with larger paint cans and longer brushes, I just didn't have a larger paint can in the color I was painting with. 

NOTE:  This will only work if there is some paint (at least an inch) left in the can.

Here is a picture of my brush after 2 weeks of use.  The bristles are still in great shape!


ROLLERS


 I only bought 3 rollers, one  each for the primer, paint, and polyurethane.  To keep my painting costs down and preserve my rollers, I wrapped them in saran wrap very tightly.  Then they were wrapped in the plastic drop cloth just like my paint brush.
I also successfully used a rubber glove I was wearing to store the roller between uses.  I just inserted the roller into a used glove, twisted the opening and then wrapped it in the plastic drop cloth.


Here is my roller, still wet the second weekend of use. You can see the saran wrap that was wrapped around the roller.


Happy Painting!


Tuesday, January 22, 2013

Doctor Who Party Invites

I think when Doctor Who series 6 aired, the writers were just begging us to throw nerdy Whovian Parties. Tardis blue envelopes with an abundance of funky stamps all over? Challenge accepted. 
And if you're not a nerd, something I've now learned, you can decorate your envelope with whatever you want (even fake stamps) as long as there is a real stamp in the upper right hand corner! You don't have to be geeky to play with your mail.

Here is a screenshot of what we are aiming for:


I found this fantastic scrapbook paper at my local craft store. 59 cents for one sheet of 150 stamps? Yes please.

I also downloaded a few images from Google to stick on there too. Note: The 1st Doctor stamps (so cool).


Arrange your stamps how ever you want! I recommend doing them all the same because this can get time consuming.


I found Tardis blue envelopes and cards at the craft store they needed to be cut in half because the invitations in the episode were in postcard style. I used my paper cutter to do this because straight lines are no fun to do by hand. If you don't have a paper cutter I strongly recommend getting one, they come in handy for all sorts of things!

Lightly glue!


To dry: I pressed everything in a book and placed my cast iron pans on top to press the invitations (no wrinkles please!)
I used Google to find the actual satellite coordinates of my place. Don't forget to give everyone a number on the back of their envelope.
BYOB (Bring Your Own Banana) was my roommates brilliance! Though if your not a fan of the show, I'm sure you're scratching your head right now.


 All done!

Want: Update Dining Room furniture

So my Grandmother gave me her "dream" Broyhill dining room set that she had purchased in 1979.  It is a huge set with 2 hutches, a buffet with light a mirror, and a table with 6 chairs.  This is the set we all (7-9 cousins and 8-10 adults) sat around for Thanksgiving.  

When I got it to my house I decided not to put the buffet together with the mirror so I could have a piece of furniture on the other side of my dining room. Here are pictures of the set in my dining room.

Below shows the dining set with 6 chairs, 2 hutches, a table, and a buffet (without the mirror and topper).


Well since the set is over 30 years old it has a lot of wear.  The chairs themselves are in great condition, they are still strong and sturdy but the cushions have the original fabric and look very disgusting.  Just look at all the stains!

I dont know if you can tell very well from the picture but the fabric has quite a few stains on them.  I tried to clean them but it made it worse.  They will be replaced!
The table top itself is in terrible shape also.  There are stains and chips in the finish.


I originally wanted to refinish this furniture in a nice stain without all the grain in the wood.  Since all the pieces themselves are in sturdy condition and the legs of the tables and chairs are beautifully carved, I really don't need to buy a new set.  I just need something more up to date.  But when i was looking closely at how I was going to refinish this set, I noticed that the finish is faux paint!  Its not real wood at all and that is why the chipping revealed a whitish paint underneath.  I can't refinish this set with a new stain, so now my only option left is to paint the whole set.

So off to Pinterest to find some inspiration for a dining room furniture paint color!  I am thinking black.

Dining Room Furniture Inspiration Pictures


Sunday, January 6, 2013

Re-Vamp an Old Lamp

Cost:  $12 for 2 lamps with shades and a can of spray paint
Time:  30 minutes plus dry time


I have been looking for a lamp to put in my office for a very long time.  I found 2 of these lamps including the shades at a small antique store for $3.50 a piece.  The shades were in excellent condition.  I could not pass these lamps by. I was so excited when I got home that I started painting them right away and so I forgot to take a before picture.


They were originally brass colored.  I bought a can of Krylon Metallic Silver spray paint and went to town.  After the paint dried, I used a little black acrylic paint to create an "antiqued" effect.  I tried painting the black paint on first with a small brush but I found a paper-towel did a much better job to create the look I wanted.  I put some paint on a paper towel and rubbed all over the lamp base until I was was with what I got. 


See how nice it turned out!  The total cost for both lamps was $11 and I didn't have to go out and buy new shades.  What a great find!